Wednesday, December 31, 2014

Monday Donut Delights with guest blogger, Butterfly


Since my wonderful niece, Butterfly, is so supportive of my blog and always on hand to help out with pins, even doing ones of her own, we thought it would be a great idea to showcase her here on my blog. 

Without further ado please welcome our guest blogger, the amazing, the wonderful, Butterfly and her super yummy pin. 

Delightful Donuts
Hi, this is Butterfly! I am this blogger's niece  and every once in a while I will write a blog post. I did an awesome pin on Monday. Make your own homemade, inexpensive DONUTS! For a link to the original pin.

Stuff you will need:
Homestyle biscuits by Pillsbury
Butter ( or margarine whichever you are more comfortable with)
Cinnamon and Sugar
Oil

Tools:
Pan
Bowls
Tongs ( or something of the nature)
Spoon
Medicine cup

I bet about now you are thinking these won't taste like donuts. These will taste like biscuits, not donuts. You are wrong, trust me we all thought they would.

First step: Open your Biscuits and lay on a clean surface (we used a cutting board) Take your Medicine cup or a circular item (cookie cutter...) and press it into the biscuits. 


Roll your biscuit gently off of the medicine cup and keep the circle from the biscuit ( these will be the donut holes). Repeat this step for the rest of your biscuts.

Second step: Grab your pan and add oil. Enough to let the donut holes float partially. Heat the oil and put the donut holes in the pan. 


Flip when golden brown on the bottom. Use your tongs to take out of pan then place on the plate. 


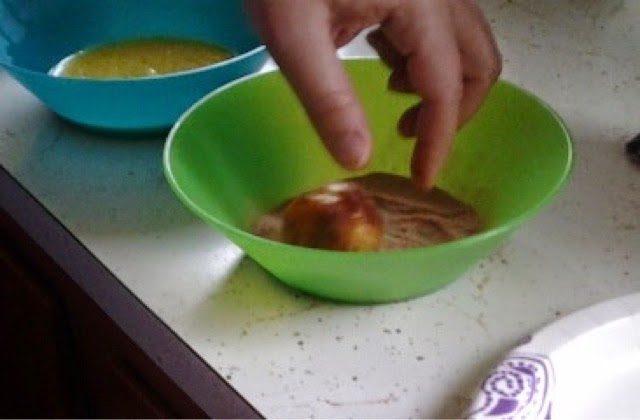
Third step: Get your two bowls and a plate ready. 

In the first bowl put in  your margarine in and melt in the microwave. The second bowl will contain cinnamon sugar. It should look something like this. 


Take your donut holes and dip in butter (don't  put too much or the cinnamon sugar wont stick). 


Then dip in cinnamon sugar and lay on plate. Volia!  Repeat this step for all donuts.


Do the same steps for the big donuts. Here are those pictures. 


Thanks for reading my blog post and comment if you like it. Bye!

Thank you so much Butterfly. You guys did a great job. They really did taste like donuts. Yummy. I'll have to make some myself. Wish me luck. 

Monday, December 29, 2014

Quote of the Day

Okay so I had a rough day (trust me you don't want to know) and, therefore am going to take the easy way out. 

Here is a lovely pic from themetapicture.com that even in my despair made me laugh so I thought I would share it with all of you. 


Let me know if it makes you laugh too. But seriously it might be true. 

Alright I'm off to bed. Let's hope the nightmare is over. Wish me luck. 

Monday, December 22, 2014

DIY Photo Canvas


Last time I did photo canvas coasters and they came out great so today I thought I would do a photo canvas to hang on the wall. Hoping for a better quality picture I used an actual photo instead of one printed on computer paper to see if it would work as well. 

I followed the same steps as last week. 

Step 1: get photo

Note: if you wish now would be a good time to paint the edges of the canvas or you can just leave it white as well. 


My picture was smaller than the canvas so I painted a border as well as the outer edges. 

Step 2:  smear a thin layer of modge podge across the canvas. Then quickly place the photo face up on the canvas, using an old credit card to smooth out any wrinkles. 


Step 3:  once it has dried, smear another layer of modge podge evenly across picture and canvas if showing. 


Et voila you have a beautiful canvas photo. Well after it dries and the white goes away. While it turned out pretty good I think I like the look and texture of it better when done with printed computer paper. 

Unfortunately I haven't been having much luck with transferring a photo to wood. I'm still working out the bugs. I'll let you know the low down when I figure it out. Wish me luck. 

P.s.  I won't be posting on Thursday due to the holiday. So until next time, Merry Christmas to all and to all a good night.

Thursday, December 18, 2014

DIY Canvas Photo Coasters


My mom has been missing her kitties while they are in lock-up at the county boarding house.  Springing them isn't an option until she finds a new place so I thought I would make her some commerative kitty coasters to reminisce over while they are gone.  I have some of my lil doggies from over the years and I absolutely love them.

While down at the local craft store, I saw some canvases in a perfect coaster size for $1 on sale so I picked them up along with some Modge Podge and looked up the pin on how to transfer photos to canvas.  I know I've seen that around somewhere.  Oh yes here it is.  Wonderful tutorial.

Didn't take long only about an hour with drying time and everything.  It took longer to pick out the pictures than it did to make the coasters.


Step 1:
Pick out some cute and cuddly kitty pictures.  Check.


Step 2:  Print out said pictures and cut them down to size (4X4 fit perfectly for the coasters).

Step 3:  Paint a thin layer of Modge Podge (matte finish) onto the canvas coaster, then lay the photo face up on top.  Quickly use an old membership or credit card to smooth out the surface, getting rid of all the bubbles and wrinkles.  Trust me I forgot this step and have some wrinkles on the coasters.  Good news is you don't notice from a good eye distance away.  Phew!  Let dry.


Step 4:  After the pictures have dried, coat with another thin layer of Modge Podge and let dry again.  Repeat as many times as you like to create a nice seal on top.  I should probably have done more than one coat, but...


Note: the picture didn't fit the coaster so I painted the edges black. 


Step 5:  Enjoy your coasters


All in all it turned out pretty good and I'm pretty sure the mamas will like them.  Next up transferring photos onto wood.  Found out it requires a gel medium, not Modge Podge so it looks like I'm headed back to the craft store.  Wish me luck.

Thursday, December 4, 2014

Funnel Cake


I used to love going to the fair as a kid.  Riding on the rides, spinning and spinning until I felt like I was going to puke.  Good times.  Nowadays I can't handle the rides.  Seriously I get sick just looking at them which is weird because I totally love roller coasters.  But at least I can still enjoy the funnel cakes. Speaking of which, I haven't had the opportunity to eat funnel cake in awhile.

No problem, let's make us some funnel cake.  You in?  Sweet.  Found a recipe on Pinterest and have a back up batter mix I got from Butterfly for a school fundraiser.

Ingredients:


  • 1 cup of milk
  • 1 cup of flour
  • 1/2 teaspoon of baking powder
  • 1 Egg
  • 2 tablespoons of powdered sugar for making the batter and more for dusting 
  • 4 cups of vegetable oil
  • 1/4 teaspoon of salt
  • 1/4 teaspoon of cinnamon
  • Food thermometer
  • Funnel


Mix together the dry ingredients in a bowl.


Then beat the milk and eggs together in another bowl.


Now is a good time to get the oil going.  I used my wok but you can use a pot or fry daddy to heat up the oil.  It's also a good idea to have a metal spatula with slits to pull the funnel cake out after it is cooked.  Trust me when I say you don't want to be hunting around for it while your funnel cake is burning to a crisp in the pan.


Next up pour the liquid ingredients into the dry ingredients or vice versa and mix into a smooth batter.


Here comes the hard part.  Pouring the batter into the oil so that it forms that nice funnel cake shape you are used to getting from the fair.  After several attempts we finally figured out how to do it, well kinda.  Our first attempt we poured the batter from a liquid measuring cup.  This turned out be too thick of a stream and we also poured too fast which caused the batter to form a big central lump with scattered droplets.


The second attempt was a little bit better in that I poured slower resulting in a more cohesive unit, but the strands were once again too thick.


The final attempt was our best try.  The trick is to pour the batter in a slow steady rate with a funnel that will create a smaller stream.  You also need to pour in a spiral from the outside to the middle.  This seemed to keep it in a single unit with thin strips.


Then of course you dump a boatload of powdered sugar over the top and eat up.  Yum Yum!  Very good stuff, but now I'm really stuffed because of course we had to sample all of our attempts.  Luckily my mom was along to help me out or I just might have exploded.  We will definitely have to try again soon with the batter I bought from Butterfly.  Hopefully I will get even better at the pouring.  Wish me luck.

Tuesday, December 2, 2014

Quest for the Best Banana Bread Ever


I love banana bread, I can't say it enough.  I mean I really, really love banana bread.  The wonderful aroma that hits your nose when you cut a slice off the loaf, the gooey moistness of the bread mixed with the sweet banana flavor as it hits your tongue.  I'm in heaven now just thinking about it until my bubble bursts when I drop back into reality and realize that I won't be able to have some because I can't make a good loaf of banana bread.  I've tried.  Many times, it just never comes out well.  It's either too dry or more likely has absolutely no flavor to it.

Then I decided.  I must search out the best recipe ever and take the time to perfect the execution of said recipe just like I did for my great grandma's chocolate chip cookies.  And that my friends took years of late nights when I was a teenager with insomnia.  Thank you dad for those late night trips to the store for supplies.

My quest has begun.  First step is to find the treasure map, AKA the best banana bread recipe known to man.  Enter my favorite site, Pinterest.  And voila, instantaneously I have a million recipes at my fingertips.  Say hello to my little friend:  Julia's Banana Bread.  Touted as the banana bread that people with drive 20 miles on a one-way road for, replete with dream-induced hallucinations.  Yeah no brainer this was the first recipe I decided to try.

Ingredients


Nonstick vegetable oil spray 
1 3/4 cup all-purpose flour 
1 1/2 teaspoons baking soda 
3/4 teaspoon kosher salt 
3 large eggs 
1 1/2 cups sugar 
1 cup mashed ripe bananas (about 2 large) 
3/4 cup vegetable oil

I had some overripe bananas left over from making a banana cream pie for my sister so I mashed those up in a bowl and mixed them with the eggs, sugar, and vegetable oil. 


Then in a separate bowl I mixed together the dry ingredients and added it to the mix.  After mixing out all the lumps I poured the mixture into a muffin tin (couldn't find my loaf tins).  The recipe said to cook for 60-70 minutes, but I only cooked mine for about 30 minutes because they were muffins instead of a big loaf.  


Piping hot right out of the oven, the smell was amazing and of course I couldn't help but shove some in my mouth right away.  Yeah don't recommend it, I burnt my tongue.  That myth about sugar taking away the burnt tongue doesn't really work, or rather not very well.  Once they cooled down I tried them again.  Definitely more flavor than my other attempts, but it's still missing something and they weren't quite as moist as I would have liked.  If you have any ideas as to how I can improve the recipe or execution of the recipe please let me know.

Update:  Okay so after making the bread I put it into a Ziploc baggie to keep it fresh.  Turns out this was all it needed.  I woke up the next morning and had a loaf and it was magically super moist with lots more flavor.  I still think it needs more banana flavor and a little something else though.  I let you know next time I try to make it.

Ah the wonderful smell of banana bread.  My house will never be the same again.

Next step try to find my loaf tin so that it will be more moist or cook for less time.  Also compare recipes to figure out what is missing.  Maybe I will compare it to Betty Crocker's recipe or that Martha Stewart one.  I'll let you know what I deduce in later attempts with an update.  Wish me luck.

Thursday, November 27, 2014

Banana Cream Pie


I'm all about the pies, no cakes.  I'm all about the pies, no cakes.  Thanksgiving is a time for pies, or so I hear so that's what I'm making.  Of course nothing will do but that I make a banana cream pie for my sister.  And if my dad was here I'd be making a lemon pie.  My mom isn't picky she loves pies, but I would probably need to make her a pumpkin pie.

As pies go Banana Cream Pie is easy to make, yeah!  Once again thank you Betty Crocker for your wonderful recipes.

Ingredients: (I used an 8-inch pie shell recipe for a 9-inch pie because I don't like it to overflow)

1/2 C Sugar
3 tbsp Corn starch
1/4 tsp salt
2 C milk
3 egg yolks, slightly beaten
1tbsp butter, softened
1 tbsp vanilla
9 or 8 inch graham cracker crust

First you mix the sugar, cornstarch and salt in a sauce pan.  Then slowly stir in the milk.  Next you cook it over medium heat, stirring constantly, until mixture thickens and boils.


Or rather I tried to stir constantly as I gathered the ingredients for the next step which requires you to have the eggs yolks prepared, oops.  Anyway boil it for one minute then stir in half of the hot mixture gradually into the egg yolks (yeah didn't realize it was supposed to be just the yolks until I went to write this which might explain why it didn't come out as smooth as usual) then blend into mixture still left in the pan.  Boil for one minute.  Remove from heat, stir in butter and vanilla then cover with a piece of saran wrap and let cool to room temperature.


While you let the mixture cool, slice up two ripe bananas and line pie crust with the banana slices.  Once mixture is cool, pour evenly into crust and refrigerate until needed.


Even though I forgot and used the whole egg it still came out tasting like a banana cream pie, but just in case I will have to make another one for my sister if she doesn't like this one.  Note to self:  don't try to cook multiple things at the same time.  Wish me luck.


Cherry Pie Sugar Cookies


Trolling Pinterest the other day I came across a recipe for mini cherry pies with a sugar cookie crust AKA cherry pie cookie cups.  Now I'm not much for pies myself, but my father-in-law loves cherry pie so I thought this would be a good idea to make for Thanksgiving this year.  I always worry though.  It just seems anytime I try to cook for anyone else it always turns out bad.  It's kind of my curse.  I should probably just stick to a regular old cherry pie, but what would be the fun in that, right?

Here goes nothing.

So I start by making a basic sugar cookie dough, thank you Betty Crocker.

Ingredients:
1 1/2 C Powdered Sugar
1 C Butter, softened
1 Egg
1 tsp vanilla
1/2 tsp almond extract
2 1/2 C all purpose flour
1 tsp baking soda
1 tsp cream of tartar

I start by mixing together the flour, baking soda, and nonexistent cream of tartar (didn't have any so I just left it out??) in a small bowl and set it aside.  Next up I mixed the powdered sugar, butter, egg, vanilla, and almond extract (this stuff smells awesome, really, really awesome) by hand.  Yup you heard me, by hand.  Turns out I had forgotten my mixer at my sister's house the other day when we whipped up some shortbread for a christmas party.  Seams kinda weird having a christmas party before Thanksgiving, but her school is weird in general so I guess it works out.  Cue curse of the can't cook for others variety.


So back to mixing the ingredients by hand.  Just mix it by hand my sister says, no problem.  That's what great grandma always did.  Well she must have had arms of steal.  I mean it was hard.  My arms were killing me.  I called mercy and left the batter a little chunky.  Then I started adding the dry ingredients I previously set aside a little bit at a time and mixed it thoroughly.  After that the dough was divided into two lumps, put into a Ziploc and set in the fridge to firm up for a couple of hours whilst the oven preheated to 350 degrees.  Meantime back at the ranch I whipped up a batch of Banana Cream Pie for my lovely sister, you can find the link for that here.


Two hours later I pulled out the sugar cookie dough, rolled it into two logs and sliced'em up into ten to twelve sections.  Then I rolled the sections into little balls.


 I placed some leftover cupcake liners into a muffin tin and placed a dough ball into each liner. 


 Next up you put the pan into the oven and let it cook for 15 minutes.  Here's the scary part.  After the timer goes off you pull them out and use a spoon to squash the center of each cookie down to make room for the cherry filling.  Fill each cookie with about a tbsp of cherry filling and cook for another 3-5 minutes (it took another 6 minutes for me to make sure the dough was cooked all the way through in the center).


While it finishes cooking, heat up a tbsp of butter and mix it with 1 C of powdered sugar and 1-2 tbsps milk.  You will use this to top your cherry pies when they come out of the oven.  Remove from muffin tin and allow to cool.  Refrigerate until ready to serve.


Well folks, for better or worse they are done.  I hope they turn out okay.  Of course I tried one to see, but I honestly hate pie, it's too sweet.  These definitely tasted like cherry pie though so I think I'm good to go.  Wish me luck.