After some thought and not a little bit of wallowing I decided to expend a little extra bit of effort to make those around me just that little bit happier by letting them know I care. Something so easy to do but usually only done on special occasions, holidays or when one is feeling guilty. Lest you think I am being selfless and altruistic, let me just say that in this I am motivated by completely selfish reasons. Try as I might to make myself happy if those around me are depressed it brings me down as well. Hence the need to spread a little sunshine around and lift the depressing cloud that is 2016 for everyone.
The plan? Well just do small, tiny things on a regular basis that I know will bring a smile. Case in point: filled my husbands candy jar the other day and gave him a massage yesterday, made a banana cream pie for my sister and played cards with my mom. Instantaneous smiles all around and a nice warm feeling in my heart.
Which brings me to my blog, lost and lonely like a neglected child. It's time to dust it off and bring it back to life if only to give my beautiful Butterfly something to look forward to every week.
How to Make an Edible Arrangement
Inspired by an edible arrangement a colleague received on Valentines Day I decided my mom would love one of those but was daunted by the exorbitant price tag. Therefore I resolved to make one myself. Here's how I did it.
Supplies
Fruit
Chocolate
Skewers
Festive container
Cookie Cutter
Step 1
Decide on a theme for your arrangement. My coworkers was made to look sort of like a flower arrangement and was in a small tin. I found a cute oversized margarita glass and naturally decided to make it look like a tropical margarita.
Step 2
Prepare the fruit.
I decided to use pineapple, grapes and chocolate covered strawberries with a watermelon base to stick the fruit skewers into.
I first cut the watermelon in half and gingerly cut the rind off the outside. This then fit perfectly into the glass to create my margarita.
Next I pushed a few grapes onto skewers for garnish and placed them in the watermelon near the side of the glass.
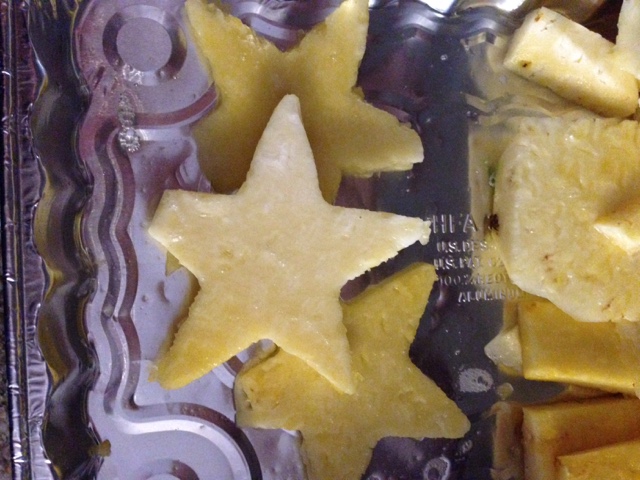
Then I cut the rind, top and bottom off the pineapple and sliced the pineapple trying to make about one inch thick pieces as large as possible. Using a cookie cutter I then cut my pineapple into shapes.
And skewered them (only one held up though since the others weren't thick enough).
Then I set about making the chocolate covered strawberries (a pin in themselves). I consulted a couple of different pins for melting the chocolate but it was a huge disaster. My chocolate kept coming out chunky (although the addition of butter to the chocolate made great tasting chocolate candies when placed in a pretty mold). Finally after lots of trial and error, two hours later I finally hit on the key to melting chocolate. I poured some chocolate chips into a small dish and microwaved it for fifteen second intervals, stirring in between intervals until it was smooth.
Then I poured the chocolate into another dish stirring occasionally to temper it and create that nice shell (thank you boys and girls at WikiHow). I then dipped my room temp, completely dry strawberries into the chocolate and set them onto parchment paper in the fridge to cool for 15-30 mins.
Step 3
Next decorate your arrangement.
Hand deliver for that extra special touch.
Note: I used a clear plastic trash bag to cover the fruit and tied it off with some ribbon. It was a great success. Her coworkers even asked where I got the pretty flower chocolates because they tasted so good.
Mission accomplished. Until next week.


