No problem, B was able to find a really cheap dress at the local Goodwill that we can add accoutrements to, but A couldn't find a pretty blue dress (she is going to be the ocean while B is going to be Aphrodite). We did, however, find a great pattern for a dress she likes at Joann's. We even found some awesome blue fabric with a sheer blue sequined fabric for a train (hmmm it bears a strong resemblance to Elsa's dress).
I love to make clothes and sew even though I may not be that great at it. One thing I absolutely hate about the process is the cutting out of the pattern and as I plan on making a practice one out of muslin to get the fit right I will have to do this twice. Yuck. Adding to the problem is the fact that B now also wants a dress in the future made from the same pattern, therefore, I will need a way to cut it out that doesn't destroy the other sizes.
No problem, I found this great pin that is supposed to solve both problems. It involves the use of freezer paper to first trace then attach to the fabric for cutting.
How to painlessly cut out a pattern (link) with freezer paper
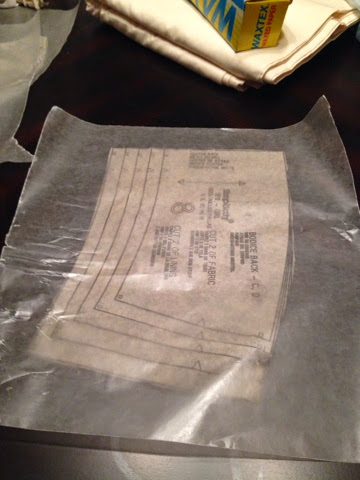 Step 1: Lay a piece of freezer paper, paper side up, on top of your pattern piece and trace all the markings onto the freezer paper.
Note: I couldn't make heads or tails of which side was the paper side so I did one on each side to try both out.
This was and incredibly easy way to get the pattern for the size I wanted without destroying all the other sizes. I didn't even need to go out and buy expensive butcher paper, etc. and the pattern was easily visible underneath to trace out all the details. Five stars. This may be harder though for a bigger pattern piece (maybe scotch tape freezer paper together for a wide enough piece?).

Note: This is where I had a problem. The freezer paper did not stick to the fabric as stated in the post. I tried ironing it on from both sides as I couldn't tell which side was the paper side. It is also possible that wax paper, what I used, is not the same as freezer paper. Not sure, but I may need to buy freezer paper from the store and try again.
Step 3: Cut out your pattern.
As the wax paper I used did not stick to the fabric I just used my phone to weight the piece down and then proceeded to cut out the pattern. It still worked great for my purposes as the bodice pieces I was cutting out were very small and easy to weight down.
All in all still a very good idea and if indeed freezer paper is different from waxed paper and will actually adhere to your fabric, this would be an incredible way to cut out patterns. I will definitely be using this again in the future and will be sure to try again with actual freezer paper. Wish me luck.
No comments:
Post a Comment